
What to Check After Getting Your Truck Back from a Repair Shop: The 2026 Post-Service Checklist

Imagine pulling your heavy-duty diesel out of the bay after an engine overhaul, only to have a simple loose fitting sideline you fifty miles into a haul. It’s a scenario that costs more than just time; it drains your revenue and damages your reputation. You’ve likely felt that lingering anxiety when leaving a service center, wondering if the work performed truly matches the invoice in your hand. Knowing exactly what to check after getting your truck back from a repair shop is the only way to replace that uncertainty with professional confidence.
We understand that your truck is your livelihood. A finished job isn’t actually complete until it’s verified by a professional eye. This 2026 post-service checklist provides a clear, technical framework to ensure your diesel engine is safe, reliable, and ready for the road. We’ll walk through the critical steps of mechanical verification, from fluid level audits to electronic diagnostic scans. You’ll also learn how to document these findings to safeguard your repair warranty and prevent future downtime.
Key Takeaways
- Verify mechanical integrity by performing a “ground check” for fresh leaks and auditing essential fluid levels immediately upon pickup.
- Discover exactly what to check after getting your truck back from a repair shop to prevent roadside breakdowns and protect your commercial revenue.
- Master diesel-specific inspections for exhaust aftertreatment systems and DEF levels to ensure modern emissions components are operating at peak efficiency.
- Execute a structured road test, including a cold start and gauge monitoring, to confirm the engine performs reliably under real-world loads.
- Secure your investment by matching final invoices against technical estimates and verifying that all warrantied repair work meets professional standards.
Why the Post-Repair Inspection is Your Final Line of Defense
Picking up your diesel truck after a major service is more than a simple transaction. It marks a critical hand-off of responsibility. To protect your equipment, you must shift your mindset from a customer paying a bill to a rigorous inspector the moment you step onto the shop lot. Even the most skilled technicians are human, and in the high-pressure environment of heavy-duty repair, small details can occasionally be overlooked. Adopting a “trust but verify” mantra isn’t about doubting your mechanic; it’s about professional accountability.
The financial stakes of skipping this step are high. A “comeback” repair-where a truck returns to the shop for the same issue-is a profit killer. When you factor in the cost of a heavy-duty tow, missed delivery windows, and the resulting downtime, a minor oversight can quickly snowball into thousands of dollars in lost revenue. By learning exactly what to check after getting your truck back from a repair shop, you act as the final quality control layer that keeps your wheels turning and your budget intact. For fleet owners who need similar quality control for heavy vehicle body repairs or repainting, check out AA Truck Body & Paint for dedicated commercial support.
Protecting Your Commercial Investment
A thorough 10-minute walkaround is often the difference between a successful haul and a 10-hour roadside nightmare. Your first priority is verifying that the shop fully addressed your original complaint. If you brought the truck in for a turbocharger issue, listen for proper spooling and check for any lingering lag. This active verification is a cornerstone of effective fleet maintenance. It also helps you identify “secondary failures.” During complex diesel teardowns, technicians must move various sensors, wiring harnesses, and vacuum lines. If one of these wasn’t re-seated perfectly, it could fail shortly after you leave the lot.
Safety and Liability Considerations
Safety is the highest priority for any commercial operator. Before you hit the highway, you need to be certain your vehicle still meets the rigorous standards of dot truck inspections near me. Pop the hood and look for anything that doesn’t belong. It’s not uncommon to find a forgotten shop rag or a stray tool left in the engine bay, both of which pose significant fire or mechanical risks. Knowing what to check after getting your truck back from a repair shop includes confirming that critical safety systems, such as lights, wipers, and brakes, weren’t accidentally disturbed during the repair process. Taking these few minutes ensures your truck is safe, legal, and ready for the long haul.
The Critical Mechanical Checklist: Under the Hood and On the Ground
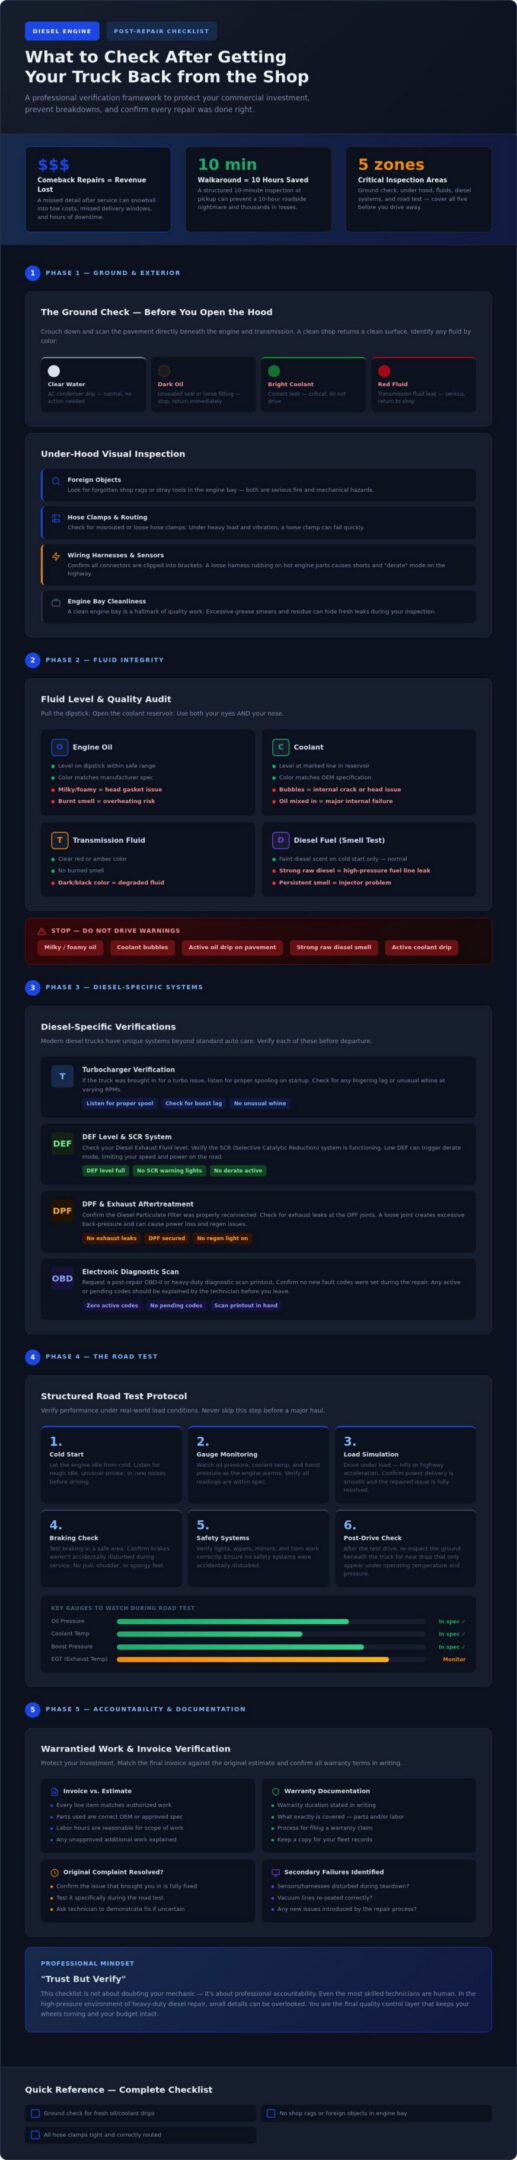
Your inspection begins before you even climb into the cab. A professional shop should return your truck in a state that reflects technical mastery. Understanding what to check after getting your truck back from a repair shop starts with the “Ground Check.” Scan the pavement directly beneath the engine and transmission for fresh drips or puddles. While a few drops of clear water from an AC condenser are normal, any sign of dark oil, bright coolant, or red transmission fluid indicates a seal that wasn’t seated or a fitting that remains loose.
Once you’ve cleared the ground, pop the hood to inspect the work area. Look specifically for misrouted lines or loose hose clamps that could vibrate off under heavy load. Electrical integrity is equally vital. Ensure that all sensors and wiring harnesses are clipped securely into their brackets. A loose harness can rub against hot engine components, leading to a short circuit and an unexpected “derate” mode while you’re on the highway. If you find anything out of place, professional fleet maintenance providers will appreciate the feedback to ensure the job meets their standards.
Fluid Integrity and Quality
Pull the dipstick and open the coolant reservoir to verify the quality of the fluids. For 2026 models, it’s essential that fluid colors match exact manufacturer specifications. Look for “milkiness” in the oil or bubbles in the coolant; these are immediate red flags for head gasket issues or internal cracks that may have been missed. Don’t rely solely on your eyes. Use a smell test to identify the sharp scent of burnt oil or the heavy aroma of raw diesel fuel, which can indicate a high-pressure fuel line leak or an injector problem that needs immediate attention.
The Visual “Cleanliness” Check
A clean engine bay is more than just an aesthetic preference. It’s a hallmark of a high-quality diesel engine repair. Technicians should wipe down the work area to help you distinguish between “ghost leaks”-old residue from the previous failure-and active new leaks. During your walkaround, check for small but critical items that are easily forgotten:
- Oil and Coolant Caps: Ensure they are tightened to the correct click or stop.
- Dipsticks: Confirm they are fully seated to prevent debris from entering the crankcase.
- Battery Covers: Verify that all protective shielding is reinstalled to prevent terminal corrosion.
- Tool Check: Look for stray sockets or rags that could interfere with belts or fans.
By conducting this methodical mechanical audit, you verify the durability of the work before the truck ever leaves the lot. This attention to detail protects your equipment and ensures that your warrantied repair work stands up to the rigors of commercial operation.
Diesel-Specific Verifications: Beyond General Auto Care
Diesel engines operate under extreme pressures and rely on complex emissions technology that generic automotive checklists simply don’t cover. When determining what to check after getting your truck back from a repair shop, you must prioritize components like the turbocharger and high-pressure fuel system. Start the engine and listen closely to the turbo. A healthy unit should have a smooth, consistent spool. If you hear a jagged whistle or metallic grinding, the technician may have missed a bearing issue or left a boost leak in the piping. Check the area around the turbo housing for any signs of fresh oil spray, which could signal a failing seal or a compromised oil feed line.
Fuel system integrity is another critical area. If your repair involved injectors or fuel filters, pay attention to how the truck starts. Extended cranking suggests the system wasn’t primed correctly or there’s air entering the lines. A professional repair ensures the truck fires up with authority. If you notice a stumble or a “hunting” idle, don’t ignore it. These are signs that the high-pressure system hasn’t reached its required operating state, potentially leading to a stall when you’re under a heavy load.
The DPF and Emissions System Status
Emissions components are currently the leading cause of “comeback” repairs in the heavy-duty sector. These systems are highly integrated; a small error during a teardown can trigger a cascade of fault codes. Before leaving the shop, verify that the dashboard is clear of any “Regen Required” or “Derate” messages. A professional inspection should include these specific visual checks:
- Soot Tracks: Look for black streaks around exhaust clamps, which indicate leaks before the aftertreatment system.
- SCR Integrity: Check for crystallized DEF buildup around the injector and sensors.
- DEF Levels: Confirm the gauge reflects a full tank if a refill was requested on your service order.
These systems are sensitive to backpressure and temperature. Even a minor exhaust leak can prevent the truck from completing a natural regeneration, eventually leading to an avoidable service stop and unnecessary downtime.
Air Systems and Brake Response
Your truck’s air system is fundamental to its safety and operation. Start by monitoring the air compressor build time. It should reach the governor cut-out pressure quickly and without hesitation. Once the system is at full pressure, turn off the engine and sit quietly in the cab to listen for any hissing sounds that indicate air leaks. This is especially vital if the repair involved work near the engine block where air lines are often routed. Finally, verify the air dryer functionality. It should purge with a sharp, clean blast. If the purge is weak or accompanied by a heavy mist of oil, the air system may have been contaminated during the repair process, requiring immediate attention to protect your brake valves and air bags.
The Road Test: Verifying Performance Under Load
The real test of any repair happens on the pavement. A static inspection is essential, but it cannot replicate the heat and stress of a loaded haul. When considering what to check after getting your truck back from a repair shop, the road test is your opportunity to verify that the mechanical theory matches real-world performance. Start with a cold start test if possible. Observe the engine’s behavior from a dead stop. It should fire up without stumbling or excessive smoke. Once you’re moving, keep a close eye on your gauges. Oil pressure must remain steady, and coolant temperatures should climb to the operating range and stay there. If you see boost levels fluctuating wildly, you may have a lingering issue with the turbocharger or wastegate.
Pay attention to the feel of the truck. Braking should be firm and linear. If you notice a pull to one side or a pulsation in the pedal, the work may have disturbed the wheel ends or air system. Transmission shifting is equally telling. Under both acceleration and deceleration, the gears should engage smoothly. Any hunting or harsh engagement suggests the electronic control module may need a reset or there’s a deeper fluid pressure issue—an area where diagnostic specialists like TIPS Automotive emphasize the importance of comprehensive electronic scanning to catch transmission faults early. If your road test reveals any inconsistencies, trust your instincts and return to the shop immediately to address the concern before it leads to a breakdown.
Testing Under Utah Conditions
Utah’s unique geography demands more from a diesel engine than flat-land driving. If your route includes mountain descents like Parley’s Canyon or the climb up Spanish Fork Canyon, you must verify your engine braking functionality. A Jake Brake failure in these areas isn’t just a nuisance; it’s a severe safety hazard. Take the truck up to highway speeds between 65 and 75 MPH on I-15 to check for vibrations that only appear at high RPMs. Finally, don’t overlook the comfort systems. Ensure your heater and defroster are fully operational to handle the biting temperatures of a Wasatch Front winter, as these systems are often disturbed during cooling system repairs.
Listening for Abnormalities
A seasoned operator knows the voice of their truck. You should be able to differentiate between the standard diesel clatter and a deep, rhythmic mechanical knock. A new knock often points to an injector timing issue or a bearing problem that requires immediate attention. Listen for turbo surge or a sharp whooshing sound under load, which usually indicates a boost leak or a loose charge air cooler pipe. If you hear new squeaks or rattles in the steering column, it’s possible the technician moved components during an engine bay repair. If these sounds persist, Diego’s Shop can provide a professional diagnostic to ensure your vehicle is truly road-ready and safe for commercial operation.
Ensuring Accountability with Warrantied Repair Work
Accountability is the final pillar of a successful service visit. While mechanical checks confirm the truck is roadworthy, the administrative audit confirms your investment is protected. This is the stage where you verify that every dollar spent translates into long-term reliability. Understanding exactly what to check after getting your truck back from a repair shop includes a rigorous review of your service documentation. Start by comparing your final invoice against the original estimate. If you followed the standards in our diesel maintenance handbook, you should have a clear expectation of the scope of work. Any discrepancies in labor hours or part costs should be addressed before you leave the lot.
Don’t hesitate to ask for the replaced parts. A professional shop often keeps these for the customer’s inspection to demonstrate the failure and prove the new components were installed. This transparency is a core part of the warrantied repair work at Diego’s Shop. We believe trust is built through technical evidence, not just verbal promises. Proper documentation isn’t just for your peace of mind; it’s essential for fleet tax records and insurance claims if a part fails prematurely. Learning what to check after getting your truck back from a repair shop ensures the administrative side of the repair is as solid as the mechanical side.
The Final Paperwork Audit
A high-quality service record is a technical biography of your truck. Ensure the technician has recorded all part numbers and serial numbers for major components like turbos or injectors. This data is vital for tracking warranty periods. You should also verify that the mileage at pickup is documented correctly on the final invoice. Most importantly, confirm the technician’s notes explain the “root cause” of the failure. Knowing why a part failed prevents you from repeating the same mistake and helps you adjust your preventive maintenance schedule accordingly.
Why Professional Shops Stand Behind Their Work
There is a fundamental difference between a “parts changer” and a master craftsman. A parts changer replaces components until the light goes out; a master craftsman understands the physics of the engine and ensures the repair is durable. At Diego’s Shop, we stand behind our work with a clear warrantied repair work guarantee. We encourage follow-up questions after pickup because we take personal accountability for every truck that leaves our bay. If you want the peace of mind that comes with expert service, Schedule your next fleet inspection with Diego’s Shop to keep your operation running at peak efficiency.
Securing Your Fleet’s Future on the Road
A successful repair isn’t finished when the technician drops the keys; it’s finished when you’ve verified the work meets your commercial standards. By performing a rigorous ground check and auditing diesel-specific components like the DPF and turbocharger, you prevent minor oversights from becoming major breakdowns. Mastering exactly what to check after getting your truck back from a repair shop is the most effective way to protect your revenue and ensure your vehicle remains a reliable asset.
At Diego’s Shop in Springville, Utah, we specialize in light, medium, and heavy-duty diesel maintenance. We offer specialized diagnostics for Peterbilt, Kenworth, and Ford models, ensuring your specific equipment receives expert care. Every job we perform is backed by our commitment to warrantied repair work, giving you the confidence to tackle the toughest hauls with ease. Don’t leave your uptime to chance.
Trust your fleet to the experts at Diego’s Shop-Book your service today. We look forward to keeping your wheels turning safely and efficiently.
Frequently Asked Questions
What should I do if a warning light comes on immediately after pickup?
Stop the vehicle safely and contact the shop immediately. Sometimes sensors need a reset or a connection was missed during reassembly. Don’t clear the code yourself; let the technician read the freeze-frame data. This helps identify if it’s a “secondary failure” from the repair or an unrelated issue. Professional shops will prioritize a post-service warning light to ensure the vehicle remains safe for commercial operation and meets all regulatory safety standards.
Is it normal for a truck to smell like oil or coolant after a major repair?
A faint smell is common as residual fluids burn off the exhaust manifold or block. However, a strong, persistent odor suggests an active leak. If the smell continues after fifteen minutes of highway driving, pull over. Check the “Ground Check” spots mentioned earlier. Knowing what to check after getting your truck back from a repair shop includes distinguishing between harmless burn-off and a failing seal that requires immediate technical attention.
How many miles should I drive for a proper “post-repair” test drive?
Aim for a 15 to 20-mile loop that includes both city stop-and-go and highway speeds. This distance allows the engine to reach full operating temperature and cycles the thermostat. It also provides enough time for the emissions system to attempt a passive regeneration. For heavy-duty trucks, try to perform this test under a partial load to verify that boost levels and transmission shifts remain consistent under real-world stress and mountain grades.
Should I ask the shop to show me the old parts they replaced?
Yes, asking to see replaced parts is a standard practice for ensuring accountability. It allows you to see the actual wear or failure point, such as a cracked manifold or a clogged filter. At Diego’s Shop, we encourage this transparency to build trust. Seeing the old components helps you understand the “root cause” of the failure, which is a vital part of your ongoing preventive maintenance strategy and long-term fleet management.
What if I find a leak a few days after getting my truck back?
Contact the shop immediately to document the finding. Most professional diesel repairs include a warranty period that covers workmanship. Clean the area and take a photo to show the technician exactly where the fluid is originating. This documentation is essential for warrantied repair work claims. Don’t wait; a small leak under high pressure can lead to a catastrophic component failure if you continue to run the truck on long-haul routes.
Does warrantied repair work cover both parts and labor?
Most comprehensive warranties cover both the replacement part and the labor required to install it, provided the failure occurred within the specified timeframe. Always confirm the specific terms before leaving the shop. At Diego’s Shop, we stand behind our technical mastery with clear warranty terms. This protection is a cornerstone of professional fleet maintenance, ensuring you aren’t paying twice for the same repair due to a component defect or an installation error.
How do I verify if my DPF was properly cleaned or replaced?
Check your dashboard for the DPF soot level gauge and ensure the “Regen Required” light is off. A properly serviced filter will show significantly lower backpressure on a professional diagnostic scan. Visually inspect the exhaust clamps for fresh soot tracks, which could indicate a leak at the filter housing. Knowing what to check after getting your truck back from a repair shop involves verifying these emissions components, as they are a frequent cause of service comebacks.
What is the most common thing repair shops forget to check?
Fluid levels and simple hardware tightness are frequently overlooked in the rush to finish a job. Technicians might focus on the complex engine repair but forget to top off the power steering fluid or tighten a battery terminal. Always perform a quick audit of caps, dipsticks, and electrical harnesses. These small details are what separate a “parts changer” from a master craftsman who takes pride in the durability and safety of their work.